How to Practice a new piece – BY YOURSELF!

Terrifying!! One main goal of piano teachers is to teach ourselves out of a job; students should be well versed enough in piano reading, literature and technique, that they can sit down and learn a piece of music without any extra input.
However, getting to that place takes work! Here are some tips for those times when a student is assigned a piece of music to learn BEFORE the teacher goes over it with them!

Step 1: LOOK

What is the Key signature? What is the first note? What fingers do you start with? These are all essential questions to begin with. Once you start playing, keep your eyes up, so you are able to read the notes fluidly without losing your spot.

Step 2: LISTEN

Do you remember what this song sounds like? If you haven’t heard it before, try listening to a recording to refresh your memory – YouTube and Apple Music are great resources! When you begin to play, listen to yourself – do the notes sound anything like what you remember hearing? Did you remember to check your key signature?

Step 3: SLOW DOWN

If this is the first time you have played this song, play it very slowly and steadily, and make sure to count either aloud or in your head. Playing hands separately is OK when you are just learning a new piece!

Step 4: SMALL CHUNKS

If a piece only has a few small sections that trip you up, remember to practice in small chunks. Pull our those bars that are trouble and play them slowly, one hand at a time. Are you counting the correct rhythms? Using the right fingers? Playing the right notes? Once you’ve rooted out the problem, practice it slowly hands together.

If you are still having trouble – THIS is when your piano teacher will step in at your lesson and help you. Proactive practicing will make for productive lessons, and you will progress much quicker through your studies!

Rhythm and rhythmic awareness.

I have to admit, I’ve never been a fan of counting rhythm. I’ve always had an ear for music, and could usually guess the right rhythms for the music; counting rhythm out loud was the bane of my existence as a child! However, rhythmic awareness is one of the most crucial components of learning and playing music.

What is rhythmic awareness? It is the ability to sense the underlying pulse of a piece of music. If you can clap along with your favourite song, you have rhythmic awareness. If it seems like everyone else is clapping when you aren’t….maybe you need to work on it :).

If your child is very small (preschool and under), clapping along or walking along to a favourite song is a wonderful way to introduce a sense of rhythm in your child. Many early childhood music programs incorporate this into their curriculum, and it is a FABULOUS idea. Children can integrate rhythmic awareness at a very early age, and teaching a child music lessons later on is a dream when the student has an inner sense of rhythm.

If your child has already started music lessons (generally ages 5+), your teacher has probably begun working on rhythmic awareness with them. However, some kids get it right away, and some don’t. Usually, clapping the rhythm of the song while saying the rhythm out loud is assigned for homework. However, that means nothing to a parent who doesn’t speak “music” – how do you say a rhythm out loud?! That generally involves, for younger children, the words ‘tah’ or ‘ti-ti’ or ‘two-o’ – all representative vocalizations of a quarter note, two eighth notes, and one half note, respectively. A student would clap once and say ‘tah’ at the same time, clap twice with the syllables of ‘ti-ti’, and clap once but hold for two seconds (syllables) when saying ‘two-o’. (Perhaps you even remember this from school! ). Essentially, we use our vocal pacing to develop an ear for rhythmic timing.

One fun way I use syllables and vocal pacing in my studio is through food rhythms! For example, if you say “strawberry ice cream” and clap the syllables as you say the words with normal pacing, you will be clapping a quarter note, two eighth notes, and two quarter notes, in their correct timing. This is fun for kids, and also helps make them aware that rhythm is everywhere in life – not just music!

For older students who struggle with rhythm, generally the first thing I get them to do is play with a metronome. Now, playing with a metronome is a skill unto itself – especially if you don’t have a good inner sense of rhythm! Luckily, it is a skill that can be trained, albeit with some hard work. The first step is to get them playing a repeated single note alongside a metronome at a reasonable steady pace – I’d say about 70 beats per minute. Anticipating the next beat, and playing accurately at the same time the metronome clicks, is very difficult! Sometimes getting the student to say ‘tah’ or ‘one and’ while playing the repeated note alongside the metronome is also helpful. Once that has been mastered (which may take more than one lesson!), I move them to playing a simple 5 finger scale, and then to a full scale, alongside the metronome. Again, adding ‘tah’ or ‘one and’ (depending on age and theoretical understanding, mostly) is helpful. If, at any point, the playing and counting is too difficult, clapping and saying alongside a metronome is also an excellent way to work on training rhythmic awareness. Once playing on the beat is mastered, you can start playing ‘ti-ti’s, (or playing on both the first and second half of each beat) using the same skill progression.

The goal is that, after all this work, the student will be able to accurately count the pieces they are working on and play alongside a metronome with *relative* ease (like I said, playing with a metronome is hard!).

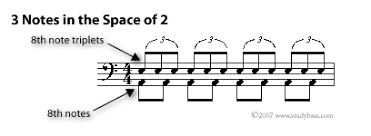
Older students generally have advanced to counting rhythm like ‘real’ musicians, using subdivided beats. This takes an understanding of relative note values (another post, another day!), but essentially they are keeping track of the shortest note values in the song, even if they aren’t playing them. For example, if a student is playing a song in 4/4 time, they will have 4 quarter notes worth of time in each bar. To keep track of the timing of the notes, we count ‘one and two and three and four and’. Each numbered count represents a quarter note of time; we say ‘and’ to mark the second half of the note, and to mark that a quarter note can be broken down into two quicker eighth notes. So, ‘one-and’ can represent holding a quarter note its full length, or it can represent two eighth notes, played on ‘one’ and ‘and’.

If students are fully capable of completing the rhythm exercises with the metronome using ‘tah’ and ‘ti-ti’, I encourage them to try counting using the more advanced method. Generally, once students are able to complete the rhythm exercises with the advanced counting, they have developed their rhythmic awareness to a place where they are able to count out and interpret their rhythms correctly.

I hope some of these ideas are helpful for you or your student! All of these ideas can be tried at home during practice if rhythm is a struggle.

-Jessica

2 VS 3: It’s ‘Not Difficult’!

No, literally: it’s “Not Di-Fi-Cult”. I was blown away by this simple solution to the challenge of playing straight notes VS triplets (also known as 2 vs 3) on the piano. Essentially, when taking a section of RH playing triplets and LH playing straight notes, the first two notes land together, and the next three notes (alternating RH-LH-RH) follow, to the rhythm of the phrase ‘Not Di-fi-cult’.

notdifficult.png

Amazing!! I tried this with a student this week, and it took something tedious and difficult to practice, into a problem solved. So pleased!


How to practice – Trills

Todays short blog post will be a few tips and tricks for getting those trills in tip top shape! If you didn’t catch last weeks post, you can find it here; I went over the common trills you see in music, and how to play them.

Now, How to practice trills!

  1. Hold that note! Hold a note down with one of your fingers (lets say finger 2), and while it remains held down, tap the note beside it quickly over and over. Do this with every finger on your hands to strengthen them, and make them more flexible.
  2. Black VS White: Using fingers 2 and 3, put fingers 3 on D. Switch between playing DCDC and DC#DC#; then try using fingers 3 and 4.
  3. Don’t forget your left hand! Do all the above exercises with your left hand as well.

Have fun mastering some speedy fingers!!

Trills, trills, trills!

Trills! Today i’m going to go over the types of trills a pianist will encounter in their music! Next week I will go over ways to practice these, for a quick and beautiful sound.

Appogiatura

appoggiatura1.1.gif

Appogiatura’s are written as a small eighth note, slurred to a longer (normal sized) note. Despite it being written to look like two different time values, the pianist actually plays them as two eighth notes! Confusing, I know.

Acciaccatura

acci_eg1.gif

Also called ‘grace notes’, these notes are played VERY quickly, moving immediately into the note it is slurred to. Fun!

Upper Mordent

uppermordent1.1.gif

Time for the squiggly lines! If you look closely, you can see the squiggly line starts low, and moves up. This is your hint as to where the trill starts, and where it moves to! With an upper mordent, you start on the given note, move to the note immediately above, and then return to the given note, in quick succession.

Lower Mordent

lowermordent1.1.gif

Watch out for the tiny line in the middle of this trill – it means to start on the given note, move to the note immediately BELOW, and then return to the given note, again in quick succession.

Turn

vid202-5.jpg

As you can see, the turn roughly follows the shape of its symbol (a sideways S); It starts on the given note, steps up, returns to given note, steps down, and then returns up to the given note.

Trill

trill.png

I saved the best for last! This is the ornament that likes to show off. With a trill, you start on the given note, and alternate rapidly between it and the note directly above, for the length of the given note. As you can see in the example, that fits in a lot of notes!

Breathing for singers

I was going to write a paragraph about breathing for singers, but I found this wonderful link courtesy of Thefullvoice.com, and it did the work for me! Take a quick read and watch the linked video  – enjoy!

Scale Practice Tips

Scales: Everyone’s best friend and worst enemy (frenemy?). I don’t know a single person who loves playing scales, but they are SO essential for developing finger strength and dexterity, evenness of touch and tone quality. Here are a few tips to make practice a little less painful/more varied!

First of all, try playing scales with rhythms. This is a great way to develop evenness of tone! For example, instead of playing straight 8th notes, try playing in a ‘long-short-long-short’ pattern, and then switching to ‘short-long-short-long’.Also try playing in triplets to achieve the same goals.

Another way is to play with a scale backing track. Thank God for technology! Scale Tracks is an app available on the iTunes store that provides backing tracks for all scales keys. Essentially, you end up feeling like you’re jamming with a band instead of playing scales, which sounds about as much fun as a person can have while practicing scales!

A third way is to play fingers 2/3 and 2/3/4 together as a group, while the thumb passes freely by itself. Not only will this help with cementing fingering, but will also make it easier for the thumb/arm to move together properly.

Finally, try playing starting on a different note of the scale. For example, if you’re playing C major, can you start on F? This will also help cement fingerings, and give your brain a nice challenge!
Good luck with practicing! 🙂

iPad Apps to make piano fun

There are so many fun apps that help students learn while gaming – a great way to practice without it feeling like practicing. Here are a couple you can try at home!

Staff Wars: This game has the feel of a space based arcade game, where students shoot the correct note from their fighter jet – but get it before the note hits the laser beam! my seven year old daughter has approved this app as fun, so i’m sure your children will agree! https://itunes.apple.com/ca/app/staffwars/id810405576?mt=8

The Most Addicting Sheep Game: Quite possibly the best name ever, and also a very useful app for student struggling with keeping a steady pace. In this app, you keep your sheep jumping to the beat in order to advance through levels and difficulty. Very fun!
https://itunes.apple.com/ca/app/the-most-addicting-sheep-game/id550921301?mt=8

Todays Tidbit: Onset!

Vocal onset! One of the most important parts of vocal technique, vocal onset is the way a singer begins the sound. There are three types of onset, but only one of them is the best way – not just for beautiful tone and production, but also for the health of your vocal chords.

Type 1: The Hard Attack, or glottal onset.
This is similar to a grunt in sound (try going “uh, uh, uh” over and over – thats the feeling!), in which the vocal chords are smashing together as the sound begins. The air pressure is held below the chords, and then there is a large release of air, which often coincides with large volume. This is a hard attack to the sound, and is very unbalanced and unpleasant sounding.

Type 2: The Soft Onset.
This sound is really common in pop music – an aspirated, breathy sound that is similar to whispering (try doing some slow ‘ha, ha, ha’s – the H sound is what we are talking about). While it sounds great for that particular style, it also is unhealthy for the vocal chords and doesn’t have much tone to the sound. I find this sound quite common in young female singers.

Type 3: The Balanced Onset.
This is what vocalists aim for – a smooth transition from silence to pure sound, without a burst of volume/glottis or airiness. The muscles are balanced, neither working too hard or too little. To achieve this, try making an ‘ah, ah, ah’ sound, imagining a silent ‘h’ in front of each sound – notice how each sound starts smoothly, with a clean sound? That’s the goal! It’s almost as if the breath and the sound occur at the same time, which is called ‘singing on the gesture of inhalation’.

Hopefully this helps you in your practice!

New project: Mini Tuts!

I’ve finally gotten around to a project i’ve wanted to start for a while – mini video tutorials on youtube! Hopefully these will help students as they practice through the week, and need a refresher on their pieces.
Here’s a link to the first video! Click me!